Using the API Reference
This page explains how to use the interactive API Reference to explore and test the Zorya API. No prior API experience is assumed.
1. Navigating the API Reference
Open the API Reference. The left sidebar groups every endpoint by topic (for example USERS & SESSIONS, SMS, WHATSAPP). Click a topic, then click an endpoint to open its page. Use the Previous / Next buttons at the bottom to move between endpoints one at a time.
Each endpoint page shows:
- The HTTP method and path (for example
POST /api/v1/User/login). - A description of what it does.
- The expected parameters, request body, and example responses.
- A panel on the right with a code snippet (switch languages with the dropdown, e.g. cURL, JavaScript, Python) and the Example Request Body.
2. Testing an endpoint ("Test" button)
Every endpoint page has a Test button (with a play icon) in the panel on the right. It looks like this:
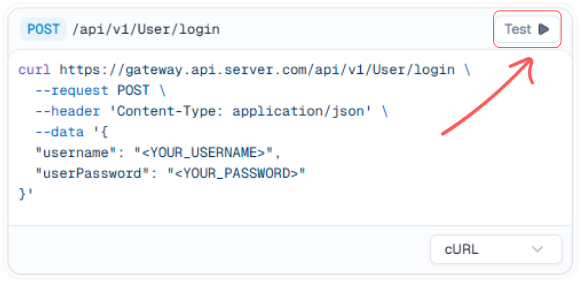
Clicking it opens the test dialog, which is split in two:
- Left side — build your request: the method and URL at the top, a Send button, and collapsible sections for Authentication, Path Parameters, Query Params, Headers, and Body (the Body section only appears when the endpoint accepts one).
- Right side — see the result: status code, response body, and the exact request that was sent.
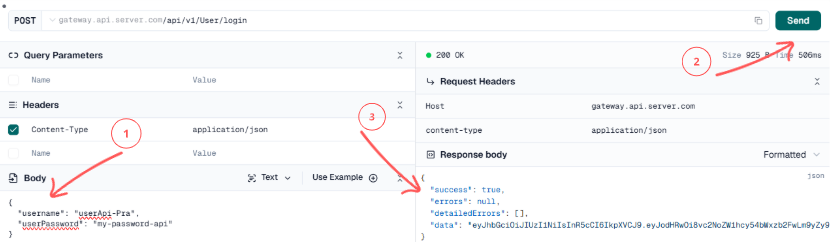
In the screenshot above:
- Request Body — the JSON payload on the left (edit it before sending).
- Send button — top right, sends the request.
- Response Body — the result on the right (status code, response body, and the exact request sent).
Fill in the fields you need, press Send, and read the response on the right. You can re-send as many times as you like after changing values.
The Body text area comes pre-filled with a valid example request. Replace the placeholder values (such as
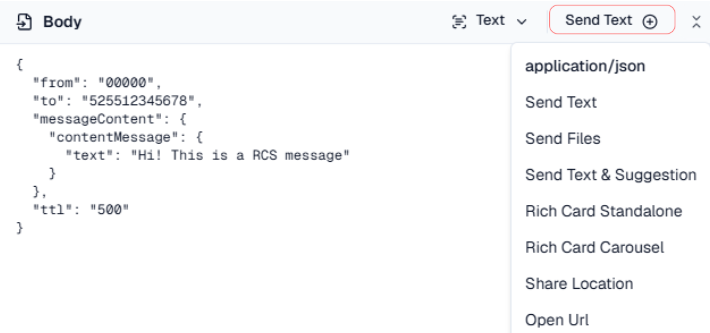
<YOUR_USERNAME>) with your own data before pressing Send. If the Body ever appears empty, click Use Example → default in the Body header to load it.For Top-Up, LookUp, Messaging, Users & Sessions, SMS, RCS and WhatsApp message sends (including WhatsApp templates), the dialog opens with the DEFAULT request type already selected in the Body header — so there is nothing to switch. Use the Body header dropdown to change to another request type when needed:
RCS — opens with
Send Textselected:
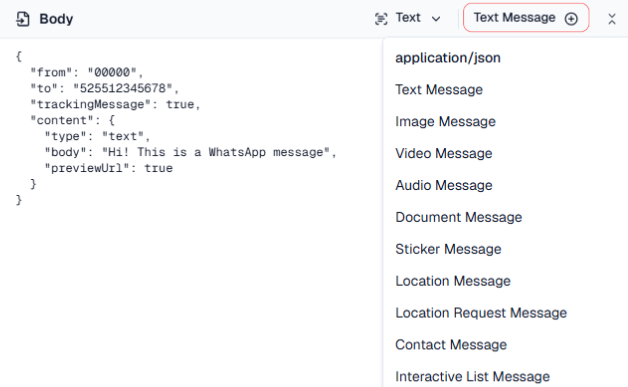
WhatsApp — opens with
Text Messageselected:
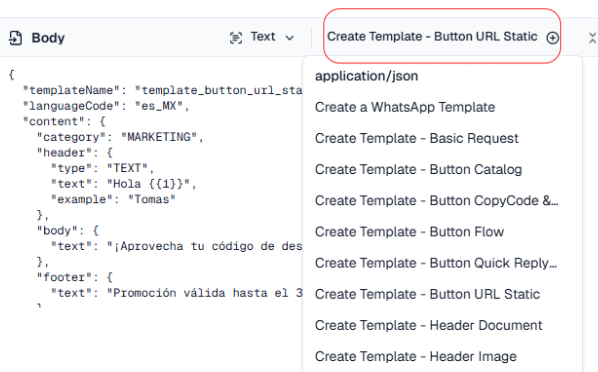
WhatsApp templates — opens with
Create Template - Basic Requestselected:
3. Request types in this API
This API uses only three HTTP methods:
| Method | Used for | Example |
|---|---|---|
GET | Reading data. No request body. | GET /api/v1/User/me — your user profile |
POST | Actions that send data (authenticate, send messages, lookups, top-ups). Always carries a JSON body. | POST /api/v1/User/login — generate a token |
DELETE | Removing something. | DELETE /api/v1/whatsapp/{phoneNumber}/templates/{templateId} — delete a WhatsApp template |
There are no
PUTorPATCHendpoints in this API.
Where each piece of data goes depends on the endpoint:
- Path parameters — part of the URL itself, shown in
{braces}. Type the value into the Path Parameters section. Example: inGET /api/v1/TopUp/status/{transactionId}, write the transaction id into thetransactionIdfield. - Query parameters — appended to the URL after
?. Fill them in the Query Params section. Example:GET /api/v1/WhatsApp/medianeedsfromandmediaId, producing a URL like/api/v1/WhatsApp/media?from=00000&mediaId=12345. - Headers — metadata of the request, edited in the Headers section. The one you will use most is
Authorization(see step 4 below). ForPOSTrequests the dialog already setsContent-Type: application/json. - Request body — the JSON payload of
POSTrequests, edited in the Body section. Example for login:
Code
And an example for a phone lookup (POST /api/v1/LookUp):
Code
The same requests as cURL, for use outside the docs:
curl -X POST "https://gateway.zorya.com/api/v1/User/login" \
  -H "Content-Type: application/json" \
  -d '{
    "username": "<YOUR_USERNAME>",
    "userPassword": "<YOUR_PASSWORD>"
  }'
curl -X GET "https://gateway.zorya.com/api/v1/User/me" \
-H "Authorization: Bearer <YOUR_ACCESS_TOKEN>"curl -X POST "https://gateway.zorya.com/api/v1/LookUp" \
-H "Authorization: Bearer <YOUR_ACCESS_TOKEN>" \
-H "Content-Type: application/json" \
-d '{
"to": "521234567890"
}'4. Full flow: generate a token and test an authenticated endpoint
All endpoints except the login require a Bearer token (see Authentication). Complete flow using only the docs:
- In the API Reference, open USERS & SESSIONS → Get a signed token for a user (
POST /api/v1/User/login). - Click Test. The Body already contains
{"username": ..., "userPassword": ...}— replace the two values with your portal credentials. - Press Send. A
200response returns{"success": true, ..., "data": "<YOUR_ACCESS_TOKEN>"}. Copy the value ofdata— that is your token (valid for 24 hours). - Open any authenticated endpoint, for example USERS & SESSIONS → Get the current active user (
GET /api/v1/User/me), and click Test. - In the dialog, open the Authentication section, select the
BearerAuthscheme, and paste your token when asked (asBearer <YOUR_ACCESS_TOKEN>). - Press Send. A
200response with your user profile confirms the token works. From now on, that same token authenticates every request until it expires.